sunnuntai 15. heinäkuuta 2018

How to Restore iTunes Library from iPod to New Computer (Windows or Mac ) 2019 Guide


How to Restore iTunes Library from iPod to New Computer (Windows or Mac ) 2019 Guide


Restore iTunes Library from iPod to New Computer via iTunes


There are several methods for restoring iTunes library from iPod to a new computer, but we’ve chosen to discuss iTunes method of restoring iTunes library from iPod to a new Windows computer or Mac.


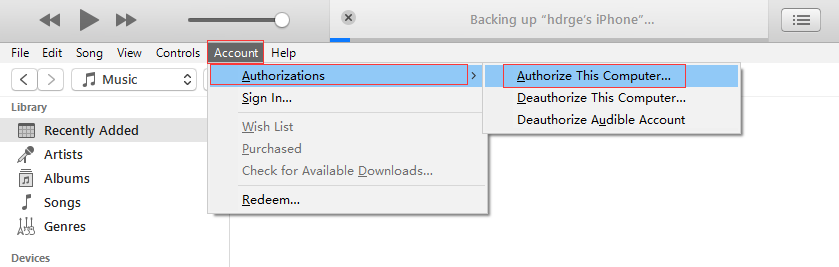
Before we continue with the steps of restoring iTunes library from iPod, we would like you to note that if you’ve not authorized your new computer on iTunes, you may not be able to access your iPod media library on iTunes.


Therefore, here is how to authorize a Mac or PC before restoring your iTunes library:


Open iTunes.


Sign in with your Apple ID.


On Mac: Go to the menu bar at the top of your computer screen to choose “Account > Authorizations > Authorize This Computer".


On Windows PC: Go to the menu bar at the top of your computer screen to choose “Account > Authorizations > Authorize This Computer". If you don’t see the menu bar, press Control + B on your keyboard.
You may also like:online youtube downloader


Enter your Password and click “Authorize”.
Steps to Restore iTunes Library from iPod to New Computer with iTunes


Download and install the latest version of iTunes on your new computer.

Jihosoft Android Data Recovery: the best Android Data Recovery software for Windows and Mac to recover deleted contacts, messages, photos, videos, WhatsApp and etc from Android devices.
Launch iTunes on your PC and connect your iPod to your PC using Apple’s original lightning cable. Your connected device will appear as an icon on the upper-left corner of iTunes windows.


Click on your iPod icon, locate Summary on the left sidebar of the iTunes window. You can check the box next to the items you want to back up by clicking on them. You can also choose whether you want to back up your entire library or choose a file.


Click “Apply” to back up the selected media files.


Repeat step 4 to back up different types of media files on your iPod.


After backing up your iPod to your PC using this method, you can search for your new iTunes library location by following these steps:


Mac: Click desktop to make sure you’re in Finder. Then choose “Go > Home”, and double-click the Music folder.


Windows: Navigate to “\Users\username\My Music\iTunes”.
Disadvantages of Using iTunes to Restore iTunes Library.


This method comes with numerous disadvantages which include:


The method is complicated and full of limitations and restrictions.


You can only transfer purchased files using this process.


iTunes allows you to authorize only 5 computers or less.


Non-purchased files will not be restored using iTunes.
Gihosoft Free iPhone Data Recovery is a professional iPhone Data Recovery software to get back all your lost text message, photo, video, call history, note, contact and more from iPhone/iPad/iPod Touch.

2 Best iTunes Replacements for Windows & Mac in 2018

First iTunes Replacement - Foobar2000


Foobar2000 is a flexible and convenient media player that has been designed to replace iTunes for playing music. It supports a number of audio formats and can be customized according to your needs and preferences. You can set up this software quickly if you are experienced with media players and then use it in any way you see fit to manage your iDevice music library. Foobar2000 is compatible with all iOS devices.


Pros


Many audio formats are supported including MP3, SND, AU, Speex, Musepack, AIFF, WAV, WavPack, FLAC, Opus, WMA, and CD Audio. Additional plugins can be installed to add support for even more formats


Advanced tagging capabilities


Gapless playback


You can rip Audio CDs easily with this software. Furthermore, you can use the Converter component of the software to transcode all supported audio formats


A lot of options are available to customize the software


Customizable keyboard shortcuts


Adjust music volume automatically via ReplayGain feature


Features and functionality of the Foobar2000 can be extended with extensions and plug-ins


Cons


The default look of the software is dull and not very appealing

Foobar2000 has a user interface which is not easy for beginners. Setting this software up can be a challenge for inexperienced users
Second iTunes Replacement - PhoneTrans

PhoneTrans is another iTunes Replacement which is free to download and install. Designed by iMobie, the main purpose of this software is to help users easily transfer media files between their iDevice and computer. PhoneTrans has a simple and straightforward user interface. Although this software does not replicate all iTunes’ features, it is still a good alternative when it comes to managing iDevice files.


When it comes to transferring music, books, videos, TV shows, and even games and apps, PhoneTrans gives you full control. You can use this software to back up your iPhone’s data, documents, and apps without jailbreaking the device. Furthermore, it also allows you to transfer backup data to another iDevice. While full iDevice backup is not allowed, this software is very good when it comes to backing up iTunes library and data of certain apps.

Pros


Two-way transfer, allowing you to transfer files between your iDevice and computer


Supports drag and drop method to transfer files


Quickly import/export music to and from iDevice


No need to sync via iTunes when you are managing iPhone files via PhoneTrans


Transfer all your iPhone music to computer via a single click


Better search experience thanks to Smart Filter


All iPhone, iPod, and iPad models are supported


Free of Cost
Cons

You cannot play music files on PhoneTrans.


The software crashes sometimes when transferring files.
Other unknown bugs may occur when transferring data between iDevice and computer If you accidentally deleted or lost videos on iPhone, first please check on the Recently Deleted folder. Alternatively, you can use the professional tool Gihosoft iPhone Recovery to recover deleted iPhone videos from Camera Roll or some apps.


Snapchat nukes Luminous and SnapColor tweaks


SNAPCHAT BLOCKS JAILBREAK TWEAKS ONCE AGAIN

Dark mode customization tweaks Luminous and SnapColor are no longer functional on Snapchat v10.36.0.23. Moreover, users are also experiencing temporary bans left, right, and center.

For those who don’t know, these tweaks were the jailbreak community’s last stand against Snapchat’s overwhelmingly strict detection methods.

With these tweaks gone, there isn’t a single package that can bypass its jailbreak detection.

Chloe, the developer of Luminous and SnapColor, confirmed the development on her Twitter handle.


The developer, however, has deactivated her account and was not available for comment as to whether these tweaks will be updated in the future.

This is not the first time Snap has had issues with the jailbreak and modding community.

They previously blocked users with third-party apps from logging in. The instant messaging app also deployed a brutal DRM system a while back that rendered all tweaks and sideloaded apps kaput.
HOW CAN YOU KEEP YOUR ACCOUNT SAFE?

To keep your account safe and secure, delete the aforementioned packages from Cydia.

Once you delete them, you can log into your account and start using the app like you’re supposed to minus the dark mode or a custom theme.

Also, don’t forget to uninstall any other tweak that injects third-party code into the Snapchat app.
WHICH TWEAKS ARE WORKING RIGHT NOW?

Now that Snapchat has nuked the last few functional tweaks, we decided to take Spectre for a test drive. It is apparently the only tweak that works right now, at least according to developer CokePokes.

Despite the developer’s contention that Spectre works with Snap’s latest version, we were greeted by the following message – not once but twice.


Even after reinstalling the package from Cydia as recommended by the developer, Snapchat kept throwing the same error message again and again.

Suffice to say, nothing is working right now with the latest version of the messaging app.

Which tweak or mod are you using right now? Drop your comments below.

Gihosoft Free iPhone Data Recovery is a professional iPhone Data Recovery software to get back all your lost text message, photo, video, call history, note, contact and more from iPhone/iPad/iPod Touch. It offers a full solution to recover your lost data in different tough situations. Besides recovering data directly from iPhone, iPad and iPod touch, it also allows you to recover data from iCloud and iTunes backup files.


Add Music to iTunes from iPhone/PC 2018 Guide


How to Add Music to iTunes via iTunes

1 Add Music from iPhone to iTunes

To add music from iPhone to iTunes easily, follow the steps below:
  • Install iTunes and click on the software to launch
  • On the Account menu, click on "Authorization" and then choose "Authorize this Computer" to grant the computer the permission to access and use your Apple ID.
  • Now login using your Details (Apple ID and password).
  • Select Authorize to finalize the authorization process.
  • Using a USB cable, plug in your iPhone to your computer.
  • Tap "File Menu >> Devices", then select Transfer Purchases from iPhone to complete the process.
select “authorize-computer”

2 Add Music Files Or Folder from PC to iTunes

  • Launch iTunes software
  • Hit "Edit > Preference > Advanced". Check to make sure that it is set to "Copy files to the iTunes Media folder when adding to library".
  • Tap OK
  • From the File menu click on "Add File to Library". For Mac users select "Add to library".
  • From your music library, browse and select your desired music files to add to your iTunes library
  • Once that is done, iTunes will immediately start copying your selected files to your iTunes music folder.

Limits/Disadvantages About iTunes

1. iTunes doesn’t detect duplicates, instead it transfers all files. This consumes too much space
2. Supports only 5 devices and limited to only one Apple ID
3. iTunes only transfers music purchased from iTunes
Bonus Tips:
11 BEST IPHONE X SECRET TIPS AND TRICKS EVERYONE SHOULD KNOW 2018
1. Open the App Switcher like a pro:
  1. Swipe up from the bottom to the middle of your screen and hold until you see the App Switcher.
  2. Swipe left or right to find the app that you want to use.
  3. Tap the app. Gihosoft Free iPhone Data Recovery is a professional iPhone Data Recovery software to get back all your lost text message, photo, video, call history, note, contact and more from iPhone/iPad/iPod Touch.
2. Bring back the home button (sort of): Go to General > Accessibility > AssistiveTouch and turn it on. You’ll now see a virtual home button that you can customize to activate shortcuts.
3. Unlock with Face ID faster: Turn off attention detection, Face ID needs a certain set of data each time it’s used, and there’s no getting around that. Face ID needs to be able to detect your eyes, nose, and mouth. While it can detect your eyes even when they’re closed (if attention is off), you’ll need to have your nose and mouth uncovered if you plan on unlocking your iPhone X with your face.
4. Show battery percentage: To show the battery percentage in the status bar, go to Settings > Battery and turn on Battery Percentage. Swipe down from the top-right corner of the iPhone X’s display to open Control Center, and check, the battery percentage is included.

5. How to disable Face ID in an instant: If you don’t want Face ID to require that you look with your eyes open at iPhone X, you can open Settings > General > Accessibility, and disable Require Attention for Face ID. This is automatically disabled if you enable VoiceOver during initial set up.
6. Flip quickly between apps
7. Save up to 60% battery life:  Check which wallpaper you using, Which apps running back and consuming energy.
8. Make Control Center easier to reach: Go to Settings > Accessibility > Reachability.
9. Quiet alarms with your Face: After picking it up, Face ID will look for your face, and if it see it, it’ll automatically lower the volume.
10. Animoji as stickers
11. Tap to wake: Many Android phones have had a “double-tap to wake” up the display feature for years. Now, iPhone X users have a similar feature, only it only requires a tap.
If you accidentally deleted or lost videos on iPhone, first please check on the Recently Deleted folder. Alternatively, you can use the professional tool Gihosoft iPhone Recovery to recover deleted iPhone videos from Camera Roll or some apps.

perjantai 13. heinäkuuta 2018

How to Factory Reset iPhone 7 2018 Guide


Remember: this removes EVERYTHING from your phone and resets it back to factory settings. If you’re sure you wish to proceed with this, follow the simple steps below. If you just want to reset a frozen device, hold “Volume Down” and “Power” for 15 seconds. That should reboot it.

Reset From Device

  1. Click on “Settings” and then on “General.”
  2. Scroll to the bottom of the General tab and click “Reset.”
  3. Tap “Erase all Content and Settings.”
  4. Enter your passcode (if you have set one) and confirm your reset by tapping “Erase iPhone.”
Your device should give you an estimate as to how long this process will take. Depending on how many apps you have, it could be anywhere from a few moments to an hour or more. During this time, the device is completely inoperable. Once finished, your phone will be like new. This is something you should do if you ever give or sell your phone to someone else as it erases all of your information.

Reset From iTunes

You may wish to simply restore using a backup of your device so that you can keep your settings, email and apps. This process involves a few more steps, but it’s still fairly simple.
  1. Connect your iPhone to your computer with its cable and allow iTunes to launch. You’ll see a button appear for your phone under “Devices” on the upper-left side of your screen. This lets you know the phone is properly connected and recognized. Select the button.
  2. If iTunes is set to automatically sync when the device is connected, it will start transferring data right away. This is a very important step so that all newly-added content will be saved, including any songs or apps you’ve purchased and photos you’ve saved. If iTunes does not automatically begin to sync, do so manually now. Press the “Sync” button at the bottom-right corner of the “Summary” option located in the left pane in iTunes.
  3. Once the sync has completed, head back to the information page within iTunes. In the middle of the main window, you’ll see two buttons. Click on the “Restore” button. Once you have done so, iTunes will warn you that restoring your iPhone to factory settings will erase all media and data. If you’ve already successfully synced, simply click the “Restore” button again to begin the process.
  4. As soon as you click the “Restore” button the second time, iTunes will automatically start the process. You’ll see several different message on the screen where iTunes tells you things – such as that it is extracting the software needed to restore your device. You’ll see things such as a message that it’s being verified with Apple, as well. Do NOT disconnect your phone from your computer while this process is going.
  5. iTunes will tell you when the phone is finished being restored, but you aren’t done quite yet! You have to restore your settings and sync everything back to the device. Let the iPhone restart itself after restoration. You may then see a message saying it needs to activate – just wait a moment and it will then tell you that process is finished.
  6. On the iTunes screen, you’ll see two options: “Set Up as a New iPhone” or “Restore From a Backup“. If you wish to restore your settings, email, contacts and other information, you’ll of course choose the “Restore From a Backup” option. Select the name of your iPhone from the drop-down menu on the right side of the screen.Once you click the button, iTunes will restore all settings and files you backed up earlier in this process. It will likely take several minutes – make sure you don’t disconnect the phone during this time. As soon as everything is restored to the iPhone it will restart itself once again. If iTunes is not set to automatically sync, please do so again now manually. This step is critical: it is when all of your files, apps, music and such will be transferred back to the iPhone.If you accidentally deleted or lost videos on iPhone, first please check on the Recently Deleted folder. Alternatively, you can use the professional tool Gihosoft iPhone Recovery to recover deleted iPhone videos from Camera Roll or some apps.

perjantai 6. heinäkuuta 2018

Facetime live photos not saving in iPhone after upgrade to ios11

Facetime live photos not saving in iPhone after upgrade to ios11


Recently with release of Apple new software many users upgrade to the latest iOS 11 and are facing many troubles with multiples bugs in iOS 11. One of such issue or bug is reported in the Facetime app. When the user try to take Facetime photo with iPhone, the iPhone seems to confirm that photo is taken but when checked in the albums it does not appears anywhere in the iphone storage. When tried to take a photo during a FaceTime call using the new live photo button on screen it doesn't save anywhere. The photos are not saved anywhere either and I have storage.  Please note the person you're facetiming also needs to have iOS 11, have you checked that? It also needs to be enabled in Settings-Facetime. The Apple manual says “The live photo is added to the Camera Roll album or, if you use iCloud Photo Library, in the All Photos album in the Photos app.”

However there are not official statements from Apple on this and not 100% working fix found but below are some list of fixes which worked for some users.
Fix 1: Reset Facetime Settings:
Quite possible that upgrade to iOS 11, it has disturbed the settings of Face time.  To Reset the setting please do, Settings>FaceTime>FaceTime Live Photo>tap on, then off and then back on again
After turning it on, off and they may come back on again after some times. Tested and confirmed by some users.

Fix 2 (Workaround): Wait for sometimes
The pics taken on Facetime may bot seems to saved in iphone but for some users it appear after long wait (24 hrs) they do save BUT, they only appears in the camera roll after a while.

Fix 3 : Restart/ upgrade
Please try a normal and hard reset of your phone this will help all apps to initialize properly.
This may be a bug which may be fixed by Apple  in recent upgrade to upgraded to iOS 11.0.1 and upgrade to latest iOS may take it to works fine

Sponsor Ads:
Gihosoft Android data recovery Free is a super awesome software specialized in Android file recovery. With this program, you are able to recover deleted photos, music, videos, messages, contacts, call logs, WhatsApp messages, Viber chat history and more from Samsung, Huawei, LG, HTC, Motorola, Google, Oneplus, Sony, Lenovo, ZTE and other Android devices directly. Meanwhile, this Android data recovery software is available for both Windows and Mac platforms.
Deleted Files Are Not Really Gone?
In fact, you don’t need to cry, as the deleted files are not really gone, they are still on your disk, and can be can be restored before it is overwritten by the new data. Wonder how to recover deleted files from Android quickly? Just refer to the following tutorials.
To recover deleted files from Android, you may need an Android data recovery software, like Gihosoft Free Android Data Recovery. With exquisite design and superb technology, this Android recovery software has won praise from the outside world.
Gihosoft Free iPhone Data Recovery is a professional iPhone Data Recovery software to get back all your lost text message, photo, video, call history, note, contact and more from iPhone/iPad/iPod Touch.
 

AirPods Pro vs AirPods: What’s the Difference

Apple today announced the new AirPods Pro with active noise cancellation, a new design, and more. The AirPods Pro is targeted towards prosu...